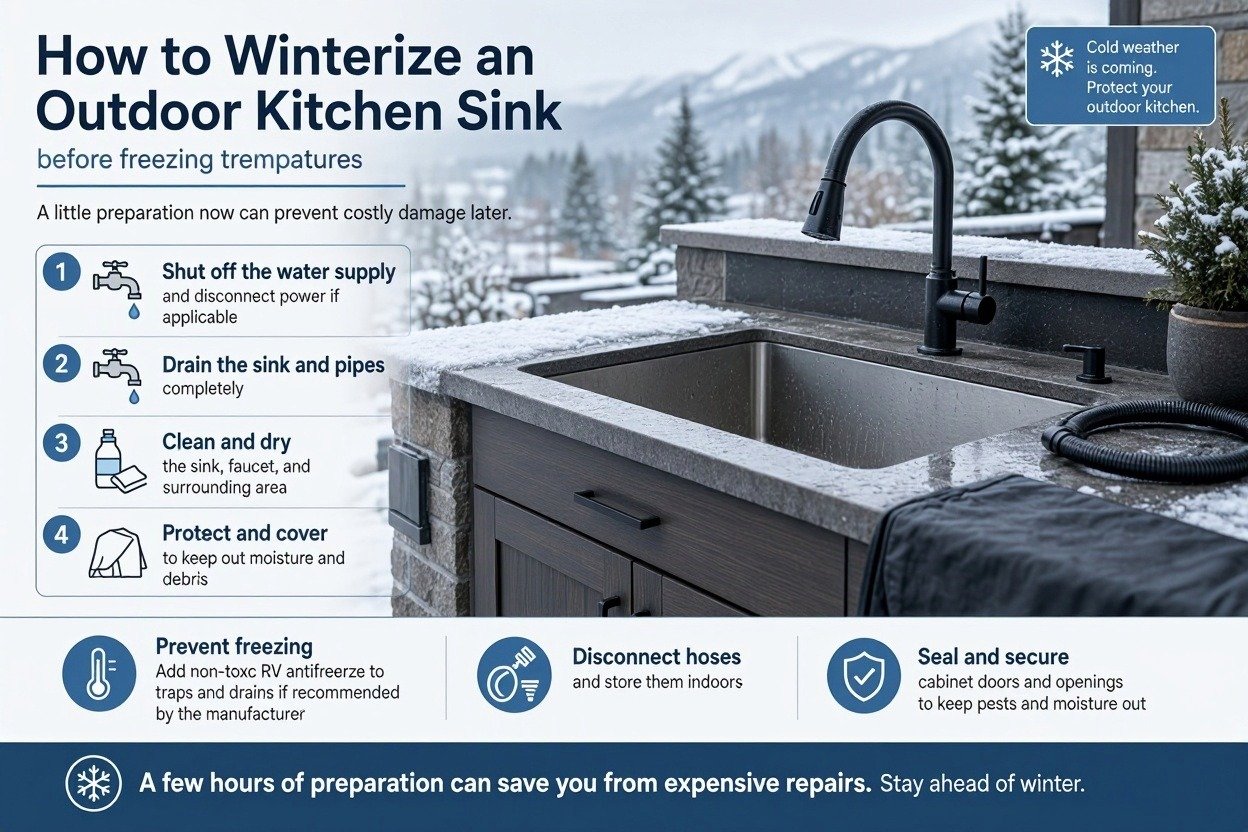
An outdoor kitchen sink needs proper winter preparation when freezing temperatures are expected. Water trapped inside supply lines, faucets, valves, and drain traps can freeze and damage plumbing components. To winterize an outdoor kitchen sink, shut off the water supply, drain the water lines, disconnect removable hoses, protect exposed plumbing, and cover the sink after cleaning it. The exact process depends on your plumbing setup and the manufacturer’s instructions. Taking these steps before winter can help prevent cracked pipes, damaged fittings, and unexpected repairs when outdoor cooking season returns.
Why Should You Winterize an Outdoor Kitchen Sink?
Outdoor kitchen sinks are exposed to weather conditions that can affect their plumbing throughout the winter. Even if the sink basin is made from durable stainless steel, the faucet, supply lines, valves, and drain connections may still be vulnerable to freezing temperatures.
When water freezes, it expands and can put pressure on plumbing components. This may lead to cracks, leaks, or damaged fittings that become noticeable when you turn the water back on in spring.
Winterizing your outdoor sink helps you:
- Reduce the risk of frozen and cracked water lines.
- Protect the faucet and shutoff valves from freeze damage.
- Prevent damage to water filters and other connected equipment.
- Keep leaves, dirt, snow, and moisture away from the sink.
- Reduce the risk of unexpected plumbing repairs in spring.
A sink cover can protect the basin from debris, but it cannot prevent damage caused by water freezing inside the plumbing. Proper drainage and protection are essential.
When Should You Winterize an Outdoor Kitchen Sink?
The best time to winterize an outdoor kitchen sink is before the first expected hard freeze in your area. Do not wait until temperatures have already dropped below freezing because water may remain trapped in exposed pipes and fittings.
Consider winterizing your sink when:
- Overnight temperatures are expected to reach 32°F (0°C) or lower.
- You will not use the outdoor kitchen for several weeks or months.
- The sink has exposed plumbing inside an unheated cabinet.
- Your outdoor kitchen is located in an area with prolonged freezing winters.
- You are closing a seasonal property for the winter.
Homeowners in mild climates may need fewer precautions than those in colder regions. However, insulation alone may not protect plumbing during prolonged freezing weather. If your outdoor sink has permanent plumbing, check the installation instructions or consult a plumber to determine how the system should be drained and protected.
Tools and Supplies You May Need
Gather the supplies you need before starting the winterization process. The exact items depend on your sink’s design and the type of plumbing installed.
| Tool or Supply | Purpose |
|---|---|
| 🪣 Bucket | Collects water when draining accessible plumbing connections. |
| 🧻 Towels | Removes standing water and dries the sink cabinet. |
| 🔧 Adjustable Wrench | Helps loosen compatible plumbing fittings when necessary. |
| 🛡️ Pipe Insulation | Helps protect exposed pipes from freezing temperatures. |
| 🚰 Outdoor Faucet Cover | Provides additional protection for compatible outdoor faucets. |
| 🏠 Outdoor Sink Cover | Protects the sink from snow, rain, leaves, and other outdoor debris. |
| 📖 Manufacturer’s Instructions | Provides model-specific winterization and maintenance guidance. |
You may need additional supplies if your outdoor kitchen includes a water filter, garbage disposal, pump, or water heater. Check each component’s instructions before beginning because some equipment requires a separate winterization procedure.
How to Winterize an Outdoor Kitchen Sink Step by Step
Step 1: Turn Off the Water Supply
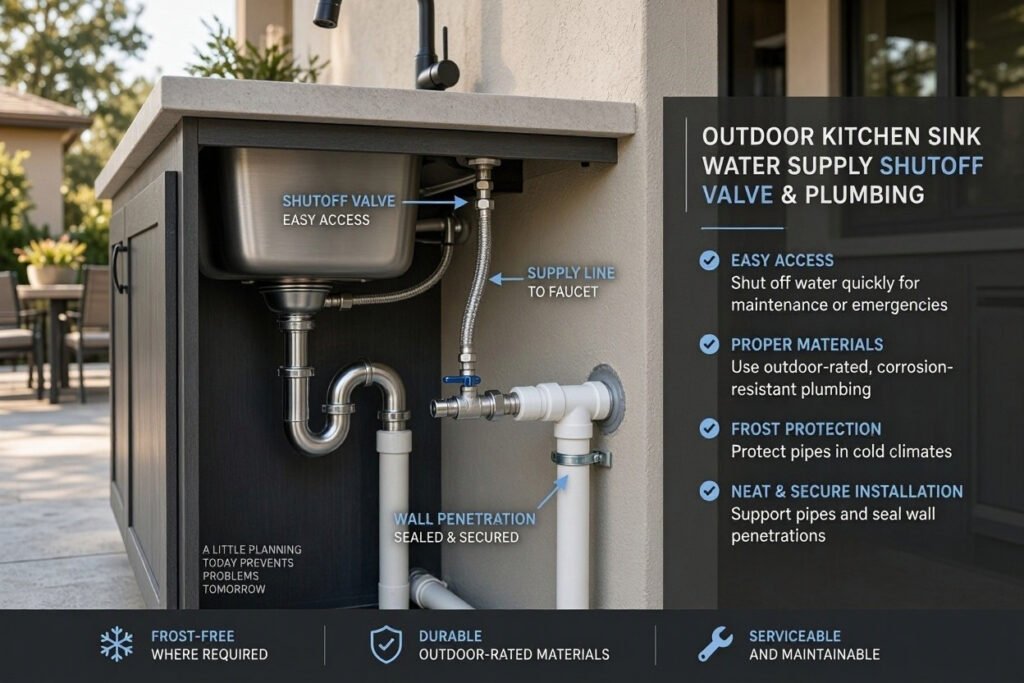
Start by locating the shutoff valve that supplies water to your outdoor kitchen sink. Depending on your installation, the valve may be inside your home, in a utility area, or inside an accessible outdoor kitchen cabinet.
Turn off the water supply to the sink. If your faucet has separate hot and cold water lines, make sure both supplies are shut off.
After closing the valve, open the faucet to check whether water continues to flow. A small amount of water may drain from the faucet as pressure is released.
If the sink shares its water supply with other outdoor appliances, identify which lines need to be shut off and winterized. Do not force a stiff or corroded valve. If you cannot identify the correct shutoff valve, ask a qualified plumber for assistance.
Important: Turning off the water supply does not automatically empty the pipes. You must also drain the vulnerable sections of the plumbing system.
Step 2: Open the Faucet and Drain the Water Lines
Once the water supply is shut off, open the faucet to release pressure and allow accessible water to drain.
Follow these steps:
- Open the hot and cold faucet handles, if applicable.
- Allow any remaining water to flow out.
- Open designated drain valves if your plumbing system has them.
- Place a bucket under accessible drain points before opening them.
- Follow the manufacturer’s instructions for leaving the faucet positioned during winter storage.
Some plumbing systems contain low points where water can collect even after the faucet stops running. These sections may require dedicated drain valves or another manufacturer-approved winterization method.
Do not assume that the supply lines are completely empty just because no more water comes from the faucet. If your installation requires compressed air to clear the lines, follow the system’s pressure limits and instructions or hire a qualified plumber. Excessive air pressure can damage plumbing components.
Step 3: Disconnect and Drain Removable Hoses
If your outdoor kitchen sink uses a garden hose or removable water connection, disconnect it after shutting off the water supply.
- Remove the garden hose from the faucet or water connection.
- Drain the hose completely.
- Disconnect removable accessories according to their instructions.
- Store hoses and detachable components in a protected location.
- Check accessible connections for signs of wear or damage.
Water can remain trapped inside a hose, nozzle, or fitting even when the faucet is no longer running. Leaving these components connected during freezing weather can increase the risk of damage.
If your sink uses permanent plumbing, do not disconnect supply lines unless you know how to isolate and drain the system safely. Follow the manufacturer’s instructions for flexible supply connections and other removable components.
Step 4: Drain the Sink Basin and Check the Drain Trap
After draining the supply lines, remove standing water and debris from the sink basin. The drain assembly also needs attention because water can remain inside the trap beneath the sink.
Follow these steps:
- Remove food particles and debris from the sink strainer.
- Wipe out standing water from the basin.
- Inspect the accessible drainpipe and P-trap.
- If the trap must be opened for winterization, place a bucket underneath it first.
- Drain and reassemble accessible components according to the manufacturer’s instructions.
- Dry the cabinet floor and inspect for signs of leaks.
A P-trap normally holds water to prevent sewer gases from entering the home. Do not leave a drain connected to household plumbing open or remove its protective seal without an appropriate winterization plan.
If the trap cannot be completely emptied, consult a plumber or the plumbing manufacturer about an appropriate method. Use only a product specifically approved for the intended plumbing application if antifreeze is required. Never use automotive antifreeze in a sink drain.
If your outdoor sink drains into a removable graywater container, empty and store that container according to its manufacturer’s instructions.
Inspect all plumbing connections. If you notice moisture or dripping, use our Kitchen Sink Leak Troubleshooting Tool to identify common problems.
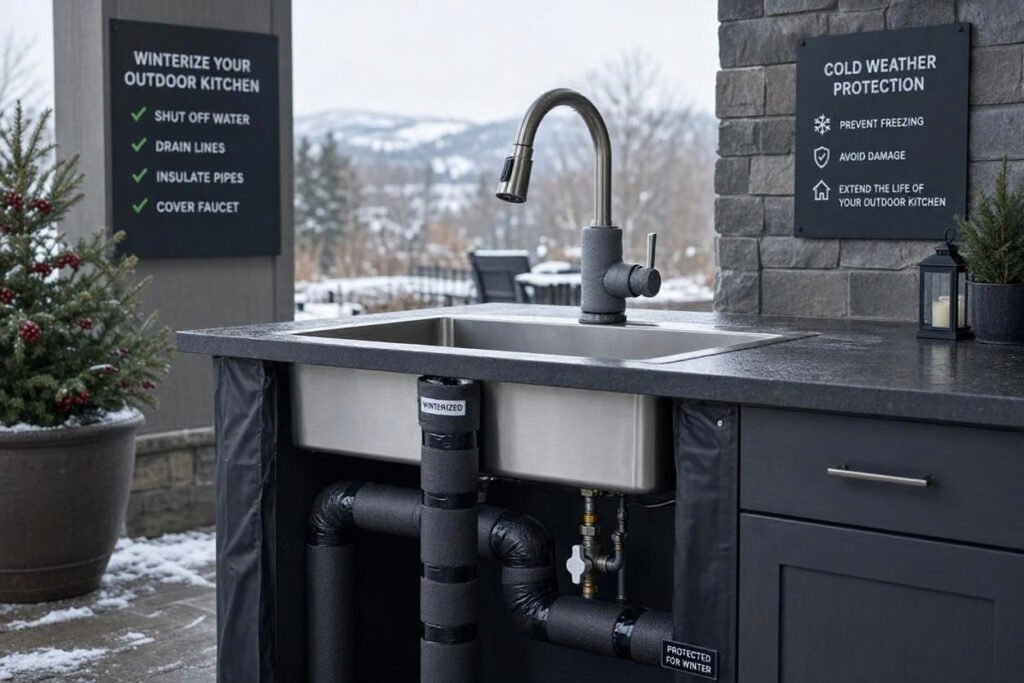
Step 5: Protect the Faucet and Exposed Pipes
Once the plumbing has been drained as thoroughly as the installation permits, protect exposed components from winter weather.
- Install suitable insulation around exposed water pipes.
- Use a compatible outdoor faucet cover where appropriate.
- Protect vulnerable connections from wind-driven rain and snow.
- Keep shutoff valves and drain points accessible for inspection.
- Follow the manufacturer’s instructions for any installed freeze-protection system.
Pipe insulation slows heat loss but does not guarantee that water inside a pipe will not freeze. Prolonged cold weather can still damage vulnerable plumbing, particularly if water remains trapped inside.
If your outdoor kitchen has a heating cable or other freeze-protection equipment, follow its installation, operating, and electrical safety instructions. Do not assume that a heating system is suitable for every pipe material or outdoor condition.
For permanently installed outdoor plumbing in regions with severe winters, professional winterization may be necessary.
Step 6: Winterize Water Filters and Other Equipment
An outdoor kitchen sink may connect to additional equipment that contains water. Each component may need separate preparation before freezing weather arrives.
Water filters: Shut off the filter supply and follow the manufacturer’s directions for draining the housing, removing cartridges, and storing components. Freezing can damage filter housings and internal parts.
Garbage disposals: Turn off the electrical supply before cleaning or inspecting the unit. Remove food debris and follow the manufacturer’s seasonal shutdown instructions. Do not pour chemicals into the disposal unless the manufacturer explicitly permits them.
Outdoor refrigerators and ice makers: If these appliances have water connections, shut off and drain the supply lines according to their manuals. Ice makers may have separate water reservoirs or internal lines that need attention.
Water heaters and pumps: Follow the specific draining and shutdown procedure for each appliance. Draining the sink does not necessarily empty a connected pump or water heater.
If several appliances share a water supply, check every branch of the plumbing system so that no vulnerable section is overlooked.
Step 7: Clean, Dry, and Cover the Sink
The final step is to prepare the sink and surrounding area for storage.
- Remove food particles, grease, and other debris.
- Clean the basin using a product suitable for the sink material.
- Dry the basin, faucet exterior, and accessible cabinet surfaces.
- Inspect visible fittings and seals for damage.
- Secure a weather-appropriate outdoor sink cover.
- Make sure the cover does not trap excessive moisture against the sink.
For stainless steel sinks, follow the manufacturer’s cleaning recommendations and dry the surface to reduce water spots. For stone countertops and other surrounding materials, use the appropriate care products.
For long-term durability, follow our guide on Kitchen Sink Materials and Countertops Compatibility.
Choose a cover that fits securely and can withstand local winter weather. If your outdoor kitchen cabinet has ventilation requirements, do not block them with an unsuitable cover.
Remember that a cover protects the sink’s surfaces from weather and debris. It does not replace proper plumbing winterization.
Outdoor Kitchen Sink Winterization Checklist
Use this checklist before closing your outdoor kitchen for the winter.
Outdoor Sink Winterization Checklist
Complete these steps to prepare your outdoor sink for freezing weather.
Winter tip: Follow the sink, faucet, filter, and appliance manufacturers’ winterization instructions. Drain or protect all vulnerable plumbing sections, including concealed areas where accessible.
If any water-containing component cannot be drained or protected according to its instructions, resolve that issue before freezing temperatures arrive.
Freezing temperatures can damage plumbing, so it’s important to protect outdoor plumbing during winter.
Common Outdoor Kitchen Sink Winterization Mistakes
Avoid these common mistakes when preparing your outdoor sink for winter.
Outdoor Sink Winterization: Mistakes to Avoid
Avoid these common mistakes to help protect your outdoor sink and plumbing during freezing weather.
| Mistake | Why It Can Cause Problems | Better Approach |
|---|---|---|
| 01 · Water supply Turning off the water without draining the lines | Water may remain trapped and freeze. | Drain the vulnerable plumbing using its intended drain points. |
| 02 · Hot water Forgetting the hot-water line | Water can remain inside the hot-water supply. | Winterize both hot and cold lines. |
| 03 · Garden hose Leaving a garden hose attached | Water can remain inside the hose or faucet connection. | Disconnect and drain the hose. |
| 04 · Drain trap Ignoring the drain trap | Retained water may freeze and damage the trap. | Follow the appropriate trap winterization procedure. |
| 05 · Pipe insulation Relying only on pipe insulation | Insulation does not remove trapped water. | Drain vulnerable lines and use suitable freeze protection. |
| 06 · Moisture Covering a wet sink | Trapped moisture can contribute to staining or mildew. | Clean and dry the surfaces before covering. |
| 07 · Antifreeze Using automotive antifreeze | It is not intended for this application and can create contamination hazards. | Use only a product approved for the specific plumbing application, if needed. |
Turning off the water supply is only one step. Follow the manufacturer’s instructions to drain and protect all vulnerable plumbing, fixtures, filters, and connected appliances.
Taking a little extra time to check each component can help prevent damage that might otherwise go unnoticed until spring.
Can You Leave an Outdoor Kitchen Sink Connected During Winter?
Yes, some outdoor kitchen sinks can remain connected during winter, but only when their plumbing is designed and protected for the expected temperatures.
A permanent outdoor sink may have buried supply lines, dedicated shutoff valves, drain points, or a professionally installed freeze-protection system. Whether it can remain connected depends on the installation, local frost conditions, and the manufacturer’s instructions.
A seasonal sink supplied by a garden hose usually requires a different approach because exposed hoses and connections can be particularly vulnerable to freezing.
If your outdoor kitchen experiences prolonged freezing weather, do not rely on a faucet cover or insulated cabinet alone. Ask a qualified plumber to confirm that the supply lines, valves, drain components, and connected appliances can be safely winterized.
Monitor local weather and follow winter storm safety recommendations before severe cold arrives.
Frequently Asked Questions
How do I winterize an outdoor kitchen sink?
Shut off the water supply, open the faucet, drain accessible supply lines, disconnect removable hoses, and address water remaining in the drain trap. Protect exposed plumbing, winterize connected equipment according to its instructions, and clean and cover the sink.
Do outdoor kitchen sinks need to be drained in winter?
If freezing temperatures are possible and the plumbing is not designed to remain operational in those conditions, vulnerable water-containing components should be drained or otherwise protected using an appropriate winterization method.
Should I leave my outdoor faucet open during winter?
It depends on the faucet and plumbing design. After draining the supply line, follow the manufacturer’s recommended position for winter storage. Some systems require the faucet to remain open, while others have different instructions.
Can I use antifreeze in an outdoor kitchen sink drain?
Use only a plumbing-safe product specifically approved for the application, and follow the product label. Some seasonal plumbing systems use non-toxic RV or marine antifreeze in drain traps that cannot be emptied completely. Never use automotive antifreeze or pour a product into a drain without confirming its suitability.
Will pipe insulation prevent my outdoor sink from freezing?
Not by itself. Insulation slows heat loss, but prolonged freezing temperatures can still freeze water inside pipes. Draining vulnerable lines or using a properly designed freeze-protection system is important.
How do I winterize an outdoor sink connected to a garden hose?
Turn off the water supply, disconnect the hose, drain the hose and faucet connection, and remove detachable accessories according to their instructions. Drain the sink and any connected components that could retain water, then store removable items in a protected location.
Do I need to winterize a stainless steel outdoor sink?
The stainless steel basin itself may tolerate cold weather, but the faucet, supply lines, drain fittings, and other water-containing parts can still be damaged by freezing. Clean and dry the basin, follow its care instructions, and winterize the plumbing based on the local climate.
When is the best time to winterize an outdoor kitchen sink?
Complete winterization before the first expected hard freeze. If an unexpected cold snap is forecast, shut off the water and arrange appropriate drainage or professional assistance as soon as it is safe to do so.
Final Thoughts
Winterizing an outdoor kitchen sink is mainly about removing or protecting water in vulnerable plumbing components before freezing weather arrives. Start by shutting off the water supply, draining the lines, checking the faucet and drain trap, and following the specific instructions for filters and other connected equipment.
Finish by cleaning and drying the sink, inspecting accessible connections, and securing a suitable cover. If your permanent plumbing cannot be fully drained using its intended drain points, a qualified plumber can help you prepare the system for winter and reduce the risk of costly freeze damage in spring.
Get Helpful Sink Tips
Subscribe for practical sink planning tips and helpful resources for small kitchens and compact spaces.

Khadija is the writer and founder of Tiny Sink Solution. She creates practical guides about small kitchen sinks, faucets, and compact kitchen maintenance, helping homeowners and renters choose solutions for limited spaces. Some articles contain affiliate links, and as an Amazon Associate, she earns from qualifying purchases at no extra cost to readers